Bug hunting system: Difference between revisions
Jump to navigation
Jump to search
Created page with "You see a bug net (linked).<br> Maximum allowed baits: 2.<br> Cooldown: 9 ~ 10 seconds.<br> <br> The system is similar to fishing rods, in fact the cooldown for fishing and bu..." |
No edit summary |
||
| (8 intermediate revisions by 2 users not shown) | |||
| Line 1: | Line 1: | ||
You see a bug net (linked). | |||
Maximum allowed baits: 2. | <table border="1" colspan=0 align="center"><tr> <th>Name</th><th>Look</th><th>Description</th> <tr> <td>Bug Net</td><td>[[File:Bug_net.png]]</td><td>You see a bug net (linked). Maximum allowed baits: 2. Cooldown: 9 ~ 10 seconds.</td> </tr> <tr> <td>Weedle Jar</td><td>[[File:Weedle_Jar.png]]</td><td>You see a Weedle jar. While equipped you can find only Bug type Pokemon. Additionaly you can find Big Galvantula. Cannot be used with Caterpie Jar or Grimer Jar.</td> </tr> <tr> <td>Caterpie Jar</td><td>[[File:Caterpie_Jar.png]]</td><td>You see a Caterpie jar. While equipped you can find only Flying type Pokemon. Cannot be used with Weedle Jar or Grimer Jar.</td> </tr> <tr> <td>Grimer Jar</td><td>[[File:Grimer_Jar.png]]</td><td>You see a Grimer jar. While equipped you can find only Poison type Pokemon. Cannot be used with Weedle Jar or Caterpie Jar.</td> </tr> <tr> <td>Shiny Grimer Jar</td><td>[[File:Shiny_Grimer_Jar.png]]</td><td>You see a Shiny Grimer jar. While equipped you can find only strong Pokemon.</td> </tr> <tr> <td>Shiny Venonat Jar</td><td>[[File:Shiny_Venonat_Jar.png]]</td><td>You see a Shiny Venonat Jar. Gives a small chance to find Shiny Pokemon.</td> </tr> <tr> <td>Venonat Jar</td><td>[[File:Venonat_Jar.png]]</td><td>You see a Venonat jar. Gives a small chance to find 1 additional Pokemon and a very small chance to find 2 additional Pokemon. Cannot be used with Shiny Caterpie Jar.</td> </tr> <tr> <td>Shiny Caterpie Jar</td><td>[[File:Shiny_caterpie_jar.png]]</td><td>You see a Shiny Caterpie jar. Gives a small chance to find 2 additional Pokemon and a very small chance to find 3 additional Pokemon. Cannot be used with Venonat Jar.</td> </tr> <tr> <td>Cutiefly Jar</td><td>[[File:Cutiefly_Jar.png]]</td><td>You see a Cutiefly jar. Boosts chance to find Pokemon by 20%.</td> </tr> <tr> <td>Shiny Weedle Jar</td><td>[[File:Shiny_weedle_jar.png]]</td><td>You see a Shiny Weedle jar. Gives a small chance to find Cloned Pokemon. Cannot be used with Shiny Venonat Jar, Shiny Grimer Jar, Weedle Jar, Caterpie Jar or Grimer Jar. Only works inside Cloned Island.</td> </tr> <tr> <td>Bug Net Box</td><td>[[File:Bug_net_box1.png]]</td><td>In this box you can find any bait that can be used with Bug Net.</td> </table><br> | ||
Cooldown: 9 ~ 10 seconds.< | |||
< | There are certain items that can help by providing bonuses to the Bug Net system. These are: | ||
<table border="1" colspan=0><tr> <th>Nazwa</th><th>Look</th><th>Opis</th> <tr> <td>Quince Cake</td><td>[[File:Cad023.png |link=|center]]</td><td>Spawns 50% more extra Pokemon when using Bug net. Boosts catch rate of poison, bug and flying type Pokemon. These boosts last 72 hours.</td> </tr> <tr> <td>Extra bug hunting ticket</td><td>[[File:TKT.png]]</td><td>Spawns 50% more extra Pokemon when using Bug net. These boosts last 2 hours.</td> </tr> <tr> <td>Squirtle Cioppino</td><td>[[File:Squirtlecio.png]]</td><td>Reduces bug hunting cooldown by 50% during 3 hours.</td> </tr> <tr> <td>Wartortle Cioppino</td><td>[[File:Warciop.png]]</td><td>Reduces bug hunting cooldown by 55% during 30 hours.</td> </tr> </table><br> | |||
Below is information about the locations where you can use the Bug Net: | |||
< | |||
You see a Weedle jar. | <table border="1" colspan=0 align="center"><tr> <th>Where to use it</th><th>Pokemons that can spawn</th> <tr> <td>[[File:Arbustos.png |link=|center]]</td><td>Spearow, Noibat, Hoothoot, Ledyba, Natu, Yanma, Murkrow, Taillow, Swablu, Starly, Combeep, Vullaby, Rowlet, Pikipek, Ekans, Grimer, Gulpin, Stunky, Skorupi, Venonat, Spinarak, Budew, Metapod, Kakuna, Pineco, Silcoon, Cascoon, Burmyp, Burmyt, Burmys, Karrablast, Grubbin, Surskit, Nincada, Sewaddle, Joltik, Cutiefly, Anorith, Weepinbell, Gloom, Nidorina, Nidorino, Alolan Grimer, Pidgeotto, Golbat, Skiploom</td> <tr> <td>[[File:Arvores.png |link=|center]] [[File:Imagem_2025-10-12_111748302.png|link=|center]]</td><td>'''Same pokemons as above with addition of:''' | ||
While equipped you can find only Bug type Pokemon. | |||
Additionaly you can find Big Galvantula. | Noivern, Butterfree, Beedrill, Pidgeot, Fearow, Farfetch'd, Scyther, Noctowl, Ledian, Crobat, Xatu, Jumpluff, Skarmory, Beautifly, Swellow, Masquerain, Ninjask, Altaria, Staravia, Staraptor, Mothim, Vespiquen, Honchkrow, Yanmega, Mandibuzz, Trumbeak, Toucannon, Swalot, Seviper, Skuntank, Venomoth, Victreebel, Ariados, Dustox, Roselia, Pinsir, Volbeat, Illumise, Wormadamp, Wormadams, Wormadamt, Escavalier, Forretress, Parasect, Shuckle, Heracross, Swadloon, Leavanny, Galvantula, Charjabug, Vikavolt, Ribombee, Vileplume, Roserade, Drapion</td> | ||
Cannot be used with Caterpie Jar or Grimer Jar.< | |||
< | <tr> <td>'''with equipped Shiny Venonat Jar'''</td><td>Shiny Noibat, Shiny Noivern, Shiny Noctowl, Shiny Staraptor, Shiny Mandibuzz, Shiny Toucannon, Mega Pidgeot, Shiny Ariados, Shiny Drapion, Shiny Escavalier, Shiny Galvantula, Shiny Seviper, Shiny Ribombee, Shiny Caterpie, Shiny Metapod, Shiny Butterfree, Shiny Weedle, Shiny Kakuna, Shiny Beedrill</td> <tr> </table><br> | ||
You see a Caterpie jar. | |||
While equipped you can find only Flying type Pokemon. | |||
Cannot be used with Weedle Jar or Grimer Jar.< | |||
< | |||
You see a Grimer jar. | |||
While equipped you can find only Poison type Pokemon. | |||
Cannot be used with Weedle Jar or Caterpie Jar.< | |||
< | |||
You see a Shiny Grimer jar. | |||
While equipped you can find only strong Pokemon.< | |||
< | |||
You see a Shiny Venonat Jar. | |||
Gives a small chance to find Shiny Pokemon.< | |||
< | |||
You see a Venonat jar. | |||
Gives a small chance to find 1 additional Pokemon and a very small chance to find 2 additional Pokemon. | |||
Cannot be used with Shiny Caterpie Jar.< | |||
< | |||
You see a Shiny Caterpie jar. | |||
Gives a small chance to find 2 additional Pokemon and a very small chance to find 3 additional Pokemon. | |||
Cannot be used with Venonat Jar.< | |||
< | |||
You see a Cutiefly jar. | |||
Boosts chance to find Pokemon by 20%.<br> | |||
<br> | |||
[[ | |||
<br> | |||
Latest revision as of 09:53, 31 October 2025
| Name | Look | Description |
|---|---|---|
| Bug Net |  | You see a bug net (linked). Maximum allowed baits: 2. Cooldown: 9 ~ 10 seconds. |
| Weedle Jar |  | You see a Weedle jar. While equipped you can find only Bug type Pokemon. Additionaly you can find Big Galvantula. Cannot be used with Caterpie Jar or Grimer Jar. |
| Caterpie Jar |  | You see a Caterpie jar. While equipped you can find only Flying type Pokemon. Cannot be used with Weedle Jar or Grimer Jar. |
| Grimer Jar |  | You see a Grimer jar. While equipped you can find only Poison type Pokemon. Cannot be used with Weedle Jar or Caterpie Jar. |
| Shiny Grimer Jar |  | You see a Shiny Grimer jar. While equipped you can find only strong Pokemon. |
| Shiny Venonat Jar |  | You see a Shiny Venonat Jar. Gives a small chance to find Shiny Pokemon. |
| Venonat Jar |  | You see a Venonat jar. Gives a small chance to find 1 additional Pokemon and a very small chance to find 2 additional Pokemon. Cannot be used with Shiny Caterpie Jar. |
| Shiny Caterpie Jar |  | You see a Shiny Caterpie jar. Gives a small chance to find 2 additional Pokemon and a very small chance to find 3 additional Pokemon. Cannot be used with Venonat Jar. |
| Cutiefly Jar |  | You see a Cutiefly jar. Boosts chance to find Pokemon by 20%. |
| Shiny Weedle Jar |  | You see a Shiny Weedle jar. Gives a small chance to find Cloned Pokemon. Cannot be used with Shiny Venonat Jar, Shiny Grimer Jar, Weedle Jar, Caterpie Jar or Grimer Jar. Only works inside Cloned Island. |
| Bug Net Box |  | In this box you can find any bait that can be used with Bug Net. |
There are certain items that can help by providing bonuses to the Bug Net system. These are:
| Nazwa | Look | Opis |
|---|---|---|
| Quince Cake |  | Spawns 50% more extra Pokemon when using Bug net. Boosts catch rate of poison, bug and flying type Pokemon. These boosts last 72 hours. |
| Extra bug hunting ticket |  | Spawns 50% more extra Pokemon when using Bug net. These boosts last 2 hours. |
| Squirtle Cioppino |  | Reduces bug hunting cooldown by 50% during 3 hours. |
| Wartortle Cioppino |  | Reduces bug hunting cooldown by 55% during 30 hours. |
Below is information about the locations where you can use the Bug Net:
| Where to use it | Pokemons that can spawn |
|---|---|
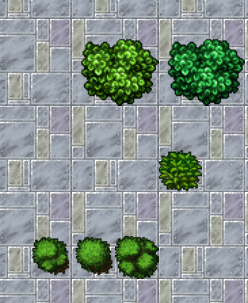 | Spearow, Noibat, Hoothoot, Ledyba, Natu, Yanma, Murkrow, Taillow, Swablu, Starly, Combeep, Vullaby, Rowlet, Pikipek, Ekans, Grimer, Gulpin, Stunky, Skorupi, Venonat, Spinarak, Budew, Metapod, Kakuna, Pineco, Silcoon, Cascoon, Burmyp, Burmyt, Burmys, Karrablast, Grubbin, Surskit, Nincada, Sewaddle, Joltik, Cutiefly, Anorith, Weepinbell, Gloom, Nidorina, Nidorino, Alolan Grimer, Pidgeotto, Golbat, Skiploom |
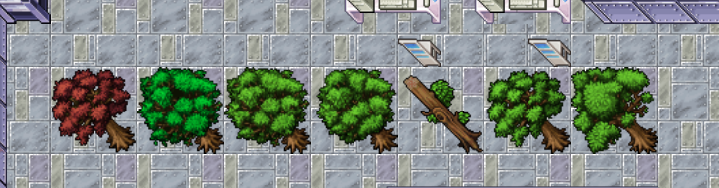  | Same pokemons as above with addition of: Noivern, Butterfree, Beedrill, Pidgeot, Fearow, Farfetch'd, Scyther, Noctowl, Ledian, Crobat, Xatu, Jumpluff, Skarmory, Beautifly, Swellow, Masquerain, Ninjask, Altaria, Staravia, Staraptor, Mothim, Vespiquen, Honchkrow, Yanmega, Mandibuzz, Trumbeak, Toucannon, Swalot, Seviper, Skuntank, Venomoth, Victreebel, Ariados, Dustox, Roselia, Pinsir, Volbeat, Illumise, Wormadamp, Wormadams, Wormadamt, Escavalier, Forretress, Parasect, Shuckle, Heracross, Swadloon, Leavanny, Galvantula, Charjabug, Vikavolt, Ribombee, Vileplume, Roserade, Drapion |
| with equipped Shiny Venonat Jar | Shiny Noibat, Shiny Noivern, Shiny Noctowl, Shiny Staraptor, Shiny Mandibuzz, Shiny Toucannon, Mega Pidgeot, Shiny Ariados, Shiny Drapion, Shiny Escavalier, Shiny Galvantula, Shiny Seviper, Shiny Ribombee, Shiny Caterpie, Shiny Metapod, Shiny Butterfree, Shiny Weedle, Shiny Kakuna, Shiny Beedrill |